Last time we left off in Part 1, I had finished building the floor of the shed. This time I will show the framing of the walls.
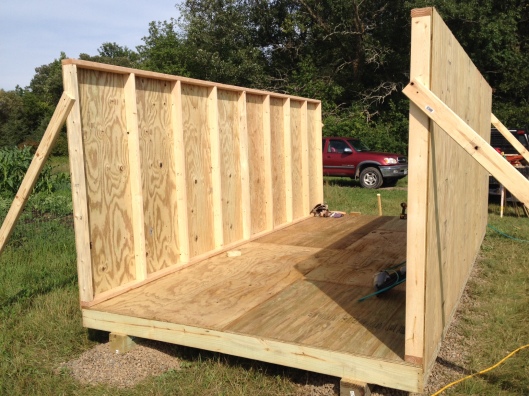
I framed up the side walls with 2×4’s on the deck of the shed. Once the wall is framed it is squared up and then sheathing is nailed to it while still laying in the floor of the shed. Doing it this way obviously makes it heavier to pick up the wall, but it makes it easier then putting on the sheathing after the wall has already been stood up.
You can see from the picture above how this is done. I used braces going out to stakes versus nailing them to the deck. This holds the walls vertical and allows you to frame the two short walls on the deck and then stand them up without interference.
Once these side walls are up, I frame the back wall and stand it up without sheathing. The reason for this is because the short walls sit inside the long walls and the sheathing laps out to the corner over the long wall. As such you would not be able to add the sheathing while it lays on the deck.
The wall with the shed doors is framed up without sheathing as well. This allows me to run the sheathing up the trusses to give added strength. (For some reason the bottom plate and rim joist look bowed, but it is a camera illusion.) I had planned to do this on the back wall, but I was rushing to get done before a rain storm, and cut them off flush with the top of the wall.
In Part 3, I will show how I frame up the trusses and set them in place. Keep watching and if you have any questions please ask and I will get back to you as soon as I can.
Dave


Pingback: Building a Garden Shed – Part 1 | Traditional Skills - David Sims
Looking good! Wish it was mine. 🙂
Thanks. I need to get the rest of this sheds progress posted. It is mostly finished and I have since started another one next to this one two days ago. This time I am building a 12×16 small woodshop. Yeah.